|
 The ultimate baguette There must be something about this time of year that makes me want to bake bread. French bread, that is, in my ongoing quest to come as close to the authentic baguette as a home chef in an American kitchen can. It was just about exactly this time last year (March 11, 2004) when I circulated a tipsheet of suggestions for tuning up your baguette. Going back to it now, I'm intrigued to see how many new ideas and technique changes I've undertaken since then.
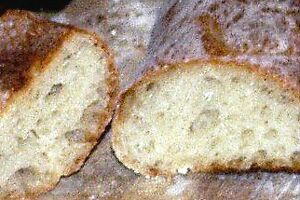
Reinhart gave me inspiration with his lyrical prose about a subject that is clearly dear to him. Walt taught me which of Reinhart's finicky, laboratory-style techniques are important and which can safely be ignored. Together, they've got me enjoying baguettes as good as I have ever eaten, so good that I'm finally willing to say that I can make a baguette at home that's as good as I've enjoyed in France. What constitutes "the ultimate baguette"? For me, it's a combination of flavor and texture, the result of a traditional process that takes the simplest ingredients - flour, water, salt and yeast and nothing more - and coaxes out of them a remarkable depth and complexity of layered flavors, in a long loaf with a crisp, caramelized reddish-brown crust encasing a golden-white interior that's light yet chewy, a virtual sponge of bubbles that range irregularly from tiny to marble-size. (See the photo above.) When I wrote about this topic last year, I felt that I had achieved the bread flavor and crust texture I wanted, but that open, "holey" texture that makes the best French baguettes unique continued to elude me. I was also, at that point, convinced of the benefits of making a "pre-ferment," variously known as biga, poolish or pate fermentée, a procedure in which a portion of dough is begun the evening before, allowed to ferment overnight, then used as all or part of the leavening for your recipe on baking day. Reinhart concurs, but Walt demurs, and after trying his technique repeatedly, I'm sold. A long, slow rise is critical, but I can't detect any additional improvement with pre-ferment compared with his procedure, which generally, depending on the temperature in your work area, takes about six hours from start to finish, much of that time spent ignoring your bread as it quietly rises. Here's my current checklist of keys to the perfect baguette, based largely on Walt's advice with a few tweaks from Reinhart and my own experience. This long list and detailed recipe may look daunting, but even if you've never baked bread, take a chance at it one of these days - follow the instructions, and it's not nearly as challenging as it seems.) • Use excellent, high-protein flour. It makes a difference. If it's available to you, I strongly recommend King Arthur brand white bread flour. • Make a wet dough, using a higher proportion of water than you'll find in most bread recipes. A "70 percent" water ratio seems to work best: 7 parts water to 10 parts flour. This dough will be harder to handle - a heavy-duty kitchen mixer with a "dough hook" makes the job of kneading easy. Otherwise, use a pastry scraper and keep your hands wet while kneading to avoid a mess. • Let your dough rise more and longer than you think you need. In the first rise, you want it to increase at least 2 1/2 times in size. One of Walt's many useful ideas is to put your dough in a lightly oiled glass or plastic container with vertical sides, so you can see the dough mounting up inside, and measure the rise accurately with a ruler. I started with about 1 1/2 inches of depth and let it rise to well over 4 inches, a process that usually takes three to four hours. In the second rising, after you form the loaves, they should double in size before you put them in the oven, another hour to hour-and-a-half. You want your dough as light and airy as possible - that's the sign that it's full of yeasty bubbles that will bake into the open, irregular air holes that we want. • Handle the dough gently and work it as little as possible after the initial kneading. Once you've got those yeasty bubbles, you don't want to lose them. Don't panic, but take as much care as you can to avoid "degassing" the dough when you take it out of the rising container, form the loaves and put them in your pans. • Invest in a few useful tools. A simple kitchen scale (digital is handy) will pay dividends in accuracy. It's much better to weigh your flour than to use measuring cups, as density varies dramatically from batch to batch. As mentioned, a heavy-duty kitchen mixer is a big time- and work-saver. A simple, two-loaf baguette pan ensures good-looking loaves and minimizes handling, and using sheets of parchment paper to line the pan also saves labor and handling. A super-sharp utility-knife blade will help slash your loaves neatly before baking without tearing or deflating the loaf. Finally, a heavy quarry stone for your oven shelf, and a simple spray bottle to spritz the oven with water will make it easy to get that thick but crisp, crackling French-style crust. This may all sound finicky and scientific, but the beauty of Walt's procedure is that it eliminates a lot of unnecessary steps and reduces baking to a relatively simple procedure that can be done in an afternoon (or overnight, if you prefer, by putting the dough in the refrigerator to rise, then taking it out a few hours before baking the next day). Since I work at home, I like to start my loaves at lunch time, which turns out perfect bread in time for dinner. INGREDIENTS: (makes two standard baguettes)
14 ounces (400g) King Arthur or other high-quality white bread flour PROCEDURE: 1. Start about 6 or 7 hours before you intend to serve the bread. Measure the flour into a large bowl. Fourteen ounces roughly equals 2 1/2 cups, but I strongly advise weighing the flour rather than measuring it out, to ensure the right flour-to-water ratio. Stir in the salt and the yeast. (I like to use Oetker, a European brand of "instant" yeast, but any dry yeast will do as long as you're sure it's fresh.) 2. Add the water - exact precision isn't necessary, and you can simply eyeball it with a measuring cup. But since I've got the scale out anyway, I like to measure an exact 9.8 ounces (280g) to get an exact 70 percent ratio. Stir to mix by hand, or mix for a minute or so using your electric mixer's paddle attachment at low speed. This will yield a thick but rather sticky dough. 3. Knead the dough for five minutes or so. As noted, this is a sticky dough, not easy to handle, so using a mixer with a dough hook attachment at medium speed is the easiest and best way to do it. If you knead by hand, use a pastry scraper and keep your hands wet to keep the dough from sticking. Avoid adding more than a small amount of extra flour, though, or you'll throw off the high water-to-flour ratio that helps get you those large holes. 4. When the dough is light and smooth, put it into a tall, lightly oiled plastic or glass container with vertical sides. Cover the top with a dish towel, and use a ruler to measure the approximate depth of the dough. Put it in a cool please and leave it to rise for three or four hours, checking periodically until it rises to a full 2 1/2 times its original height. NOTE: Do not try to save time by short-cutting this step. This full rise, more than anything else, is critical to getting the classic baguette structure. 5. When the dough has fully risen, pour it out onto a lightly floured bread board or counter top. Taking care not to handle or "degas" it any more than necessary, push it into a rough rectangle and, using a pastry scraper or heavy, sharp knife, cut it into two long portions. Line your two-loaf baguette pan with parchment paper. As gently as possible, lift each piece of dough and, letting it stretch naturally into a baguette shape, drop each piece into one of the parchment-lined channels. Cover the pan with your towel and put it in a cool place to rise until the loaves have doubled, another 60 to 90 minutes. (If you don't have a baguette pan, you can use a regular sheet pan lined with parchment paper or dusted under the loaves with a little corn meal, but the baguette pan forms pretty loaves and is a great labor-saving device.) 6. While the loaves are rising, pre-heat your oven to 400F (200C). Actually, I'll usually set the pre-heat a little hotter than that to allow for some heat loss at the start of baking, turning it down to exactly 400 when I put the bread in. If you have a quarry tile baking stone or pizza stone, put it on the middle shelf before preheating. Put a small, oven-proof pan like a bread loaf pan on the bottom shelf. Fill a clean plastic spray bottle with hot water. 7. Ready to go? Using your utility knife blade, gently cut a few diagonal slashes across the top of each loaf. Open the oven door, quickly pour 1 cup (240ml) hot water into the hot pan on the bottom shelf, taking care to avoid being burned by the blast of steam that will instantly arise. Immediately put the loaf pan on the stone (or on the shelf if you don't have a stone), and spritz the walls and the floor of the oven with the spray bottle. Close the oven door. After 30 seconds, open the door quickly and spritz again. Repeat a third and final time after another 30 seconds. Then leave the oven closed tightly for 10 minutes. At that point, turn the pan around 180 degrees to ensure even baking. If you like, the crust should now be firm enough that you can safely pop the loaves out of the parchment-lined pans and put them directly on the stone. Bake for 10 more minutes, then turn the loaves around again and let them bake for 10 more (total of 30 minutes) or until they're done. You can use the traditional baker's tricks of watching the color for a dark reddish-brown and tapping the bottoms to see if they sound hollow. The most accurate check, though, is to use an instant-read thermometer and bake until the center of the loaves registers 205 to 210F (just under 95 to 100C). Take the loaves out and let them cool on a rack for 30 minutes or so before dinner. Yes, I know. Melting butter on hot loaves straight from the oven is one of life's rare pleasures, and if you must, please feel free to indulge. But the texture is really best after they've had a little time to cool.
MATCHING WINE:
PRINT OUT A COPY OF THIS RECIPE:
If you're serious about baking bread and have the basics under your belt, you'll find this an indispensible reference, not only for its practical tips and clear, detailed recipes and procedures but also for the passion that he brings to his bread-making philosophy. It's highly recommended, with the side note that virtually all of these recipes insist on overnight pre-fermentation procedures. Reinhart makes a good, scientific case for this in terms of the time and temperature requirements needed for fermentation and the development of desirable enzymes needed for ultimate bread flavor. On the other hand, as Walt C. points out in the more informal setting of our Food Lovers' online forum, it's hard to detect any real flavor difference with same-day baking, provided your rising time is long, cool and sufficient; so while I still admire Reinhart's recipes, and his attitude, I've become quite bold about altering his recipes to fit my schedule.
To buy this book from Amazon.com at a discounted $22.05, a full 37 percent off the $35 list price (with the usual small commission to WineLoversPage.com), click the cover image above, or this link:
DISCUSS COOKING IN OUR ONLINE FORUM: Click the REPLY button on the forum page to post a comment or response. (If your E-mail software broke this long link in half, take care to paste it all back into one line before you enter it in your Web browser.) If you prefer to comment privately, feel free to send me E-mail at wine@wineloverspage.com. Last Week's FoodLetter and Archives
• Last week's Wine Advisor Foodletter: Rapini and polenta (Feb. 24)
• Wine Advisor Foodletter archive:
• 30 Second Wine Advisor archive: Let us hear from you! If you have suggestions or comments about The 30 Second Wine Advisor's FoodLetter, or if you would like to suggest a topic for a coming edition and recipe, please drop me a note at wine@wineloverspage.com. I really enjoy hearing from you, and I try to give a personal reply to all mail if I possibly can.
Of course you also have a standing invitation to participate in our interactive Food Lovers' Discussion Group. To participate in this friendly online community, simply click to
SUBSCRIBE:
Administrivia This is The 30 Second Wine Advisor's weekly FoodLetter. To subscribe or unsubscribe, change your E-mail address, or for any other administrative matters, please use the individualized hotlink found at the end of your E-mail edition. If this is not practical, contact me by E-mail at wine@wineloverspage.com, including the exact E-mail address that you used when you subscribed, so I can find your record.
Thursday, March 3, 2005
FoodLetter archives Subscribe to the 30 Second Wine Advisor
|