This article was published in The 30 Second Wine Advisor on Monday, May 29, 2006.
 |
|
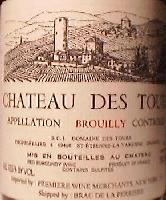
The orange color of this Chateau des Tours Brouilly label shot from April 1998 betrays uncorrected color variation from artificial light, and the sharply rounded perspective, deep side shadows and not-quite-level alignment are telltale signs of a quick, careless snapshot. |
Label shoot
Back in the early 1980s, when I started writing about wine, the personal computer was just coming on the scene and digital cameras were far in the future. If I wanted a wine-label image to accompany my column (which of course was printed only on paper), I had a couple of options: I could beg the winery to sent me a clean label (postal mail, of course, not E), or I could try my best to coax the label off my bottle with hot water and, sometimes, a dash of ammonia and a sharp razor blade.
A generation later, the world of wine hasn't changed too much (although that's another good subject for a very long article), but the tools we use to report on it have changed a great deal. From wild-eyed inspiration to your E-mail box, these words never see paper (unless for inscrutable reasons of your own you print it out); and the label images that accompany most of my wine reports come straight from the bottle to the Wine Advisor through the seeming magic of digital photography.
 |
|
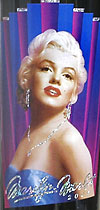
The Marilyn Merlot shot featured in Monday's Wine Advisor was taken using the principles in this article. It takes close observation to see it was photographed on the bottle: Can you pick out the clues? |
It had frankly never occurred to me to write about this process until a couple of you E-mailed me this week to ask about the Marilyn Merlot label featured (for graphics-edition subscribers) in Monday's report. "Where do you get the labels that accompany your report?," asked frequent correspondent Randy S. "Surely you don't have to resort to soaking and/or otherwise removing them yourself?"
Not any more! Frankly, the digital photography revolution came around just in time, as the art of soaking off wine labels - once a relatively easy task - became much more complicated during the 1990s when many of the world's wineries switched over to modern wine bottling lines and labeling machines using sticky-backed labels that cling to the bottle like Crazy Glue and require considerable effort to get off.
I got my first digital camera in the spring of 1998 and started using it for label photos almost immediately. It was a tiny Nikon about the size of a pack of cards, with a lens the size of a green pea and pea-size memory, too; and it made photos that were serviceable at best. (See the Chateau des Tours Brouilly image at right above, or click through to http://www.wineloverspage.com/graphics/tours.jpg if you're reading the plain-text edition and would like to view it online.)
Over the ensuing years, I've upgraded cameras periodically, and tuned up my my photo-shooting skills and PhotoShop image-tweaking abilities a little more. Just for fun, here's a summary of the how-to-do-it report I sent Randy. If it inspires you to start creating your own digital scrapbook of the wines you enjoy, that's great! And if by chance you're a photography or graphic-arts professional or skilled hobbyist and have tips you'd like to share, I'd love to have them.
- Use the best quality digital camera and lens you can justify. Mine's a Nikon D-100 digital single-lens reflex, and it serves me well as both a professional and hobby camera ... as well as a wine-label recorder.
- If you have the option, use a short telephoto lens. Mine's a Nikon AF Nikkor 28-200 zoom. This may seem counter-intuitive for shooting close-ups, but there's a good reason for it: The farther away from the label you can shoot, the less perspective (rounding) effect you get in your photo. You'll also want a camera with fairly high resolution (mine's 6 megapixels) and set it to take a large photo, so when you "crop" the label out of a larger photo, you'll still have a large-enough image to work with. (I need only a small image for online use; if you want an image large enough for printouts, you'll need to get closer.)
- Take the bottle outside and shoot the label in daylight. Even with an excellent camera, natural light seems to yield more natural color, unless you have a photo studio with professional lighting.
- Invest in high-quality image-processing software. I use Adobe PhotoShop, but you can get by with less pricey alternatives like Paint Shop Pro or Thumbs Plus. In any case, learn how to use it. A little software manipulation can make a big difference in the results, no matter how carefully you shoot your original. For Wine Advisor label shots, I'll rotate the image if necessary to get the label exactly upright, and follow up with the transform > skew function if necessary to make it perfectly rectangular. Crop the image exactly to the margins, then use the burn and dodge tools with discretion to lighten the shadows that emphasize the perspective effect of the round bottle. Use color correction if necessary to bring any outdoor blue-sky effects back to neutral white. Brightness and contrast adjustment may also be necessary, but use these tools with discretion to avoid "burned out" bright spots. Finally, size the photo to fit its destination space (I generally limit height to 210 pixels or width to 160 pixels to keep your Wine Advisor images down to a lightweight size for E-mail); and finally, try using the "unsharp mask" filter to increase overall sharpness of the image if necessary.
- Save the finished image, file it, E-mail it to a friend; print it out, or upload it to a Web server and post it on an online wine forum like our WineLovers Discussion Group. Before long you'll have an impressive digital label collection.
Sound like a lot of work? It isn't really ... at least not if you bring a fraction of the enthusiasm to photography that you do to wine.
WineLoversPage.com
|